
Discover how paper chromatography works to unveil the secrets of colors. A complete and clear guide with a step-by-step homemade experiment.
A few days ago I was tidying up my desk drawer and I came across a bunch of old markers that I thought were no longer useful. I started doodling on a piece of paper and remembered something we used to do in school that fascinated me.
I’m talking about paper chromatography, a way to separate mixtures that seems like magic but is actually quite basic and fun chemistry. I couldn’t resist trying it again, and the truth is I spent the whole afternoon experimenting with different colors and brands to see what would happen.
If you’re curious about how things work behind the scenes, you’re going to love this topic because it allows you to take apart the colors you see every day. In the end, you realize that reality is much more complex than it appears at first glance.
- What is paper chromatography?
- Its usefulness in the professional and scientific world.
- The key concepts that explain the movement of liquids.
- What is the mobile phase in this analysis process.
- What materials do we need to observe paper chromatography.
- The appropriate eluting liquids for each ink.
- Color selection for paper chromatography.
- The step-by-step for carrying out paper chromatography.
- How to analyze the results obtained on your paper strips.
- The most common failures and how to fix them.
- The mathematical calculation that provides precision to the experiment.
- Interesting variations using plant elements.
- Frequently asked questions about paper chromatography.
This post contains affiliate links; if you buy through them, you support my work (at no extra cost to you)
What is paper chromatography?
You don’t need to dive into complex scientific definitions to understand how paper chromatography works. Paper chromatography is, simply, a method used to separate the different components that make up a liquid mixture. When you see a green ink stain, your eye perceives a single unified tone, but in reality that green has been achieved by mixing several different pigments. What this system does is force those components to separate so that you can see them individually and understand how that original color was made.
The historical origin of this separation technique.
This way of analyzing substances is not new at all. Nineteenth-century scientists were already looking for efficient ways to isolate the components of plants and of the textile dyes used at the time.
The real breakthrough came at the beginning of the twentieth century thanks to the studies of the botanist Mikhail Tswett, who managed to separate the pigments from leaves using absorption columns. Over the years, other researchers discovered that ordinary cellulose-based paper was an ideal support to carry out this type of analysis quickly and cheaply.
“How Paper Chromatography Evolved Into the Method We Use Today.
Those first experiments opened the door to a completely new branch of analytical chemistry. Scientists realized that they did not need gigantic laboratories to obtain preliminary data on the purity of a substance.
The technique was refined during the mid-20th century, even earning Nobel prizes for the researchers who demonstrated its precision. Today, we still use it in an educational way because it explains the fundamental chemical principles in such a visual manner that it’s hard to forget once you’ve seen it in action.
Its usefulness in the professional and scientific world.
In the professional world, this method is used much more than we think because it is the basis of very important analyses. Researchers use it to analyze food samples and check that they do not contain prohibited additives, or in forensic laboratories to analyze traces of substances at a scene.
We’ll carry out a simplified version of the experiment at home, but the principle behind it is exactly the same as the one used by scientists in their most advanced research. In the end, it is about taking advantage of the physical properties of substances so that they reveal their true composition.
Applications in the modern food industry.
Quality technicians in food companies use systems derived from this method to ensure that what we eat is completely safe. For example, it is used to verify whether the artificial colorings in candies comply with current health regulations.
It also allows detecting if a batch of fruit juice has been adulterated with cheaper extracts or with illegal sugar syrups. It is an invisible shield that protects the consumer by analyzing the molecular chemical composition of supermarket products.
The role of the separation of mixtures in medicine.
In hospitals and medical laboratories, this principle is vital for separating proteins, amino acids, and other complex molecules present in human fluids. Urine and blood tests rely on advanced variants of this system to look for specific disease markers before symptoms appear.
Scientists who design vaccines also need to purify the active components by removing any residual impurities that could cause side effects. The ability to isolate individual molecules saves lives daily around the world.
Its importance in police forensic investigations.
Forensic police use this method when they need to identify suspicious substances found at the scene where a crime has been committed. It can be useful to know what brand the pen was that was used to write a blackmail note, by comparing the pigments of the paper with those of the suspects.
It is also essential in toxicology to isolate traces of poisons or medicines in complex biological samples. A simple stroke of ink separated in time can become the definitive proof that resolves a complicated legal case.

The key concepts that explain the movement of liquids.
For this process to occur, two fundamental elements, which chemists call phases, have to come into play. The first of these is known as the stationary phase and, in our case, it is the paper that we are going to use. It is given this name because it does not move throughout the process, but stays fixed, serving as the path or track on which the separation of the pigments will take place. This paper has to be porous so that the substances can travel through it with some freedom, while offering a minimum of resistance.
The Internal Structure of Filter Paper
If we could look at filter paper through a powerful microscope, we would see a three-dimensional network of cellulose fibers crossing in every direction. These fibers act like a maze for the molecules trying to travel through the paper.
In addition, the surface of cellulose has chemical properties that allow it to retain different substances with varying strengths. This physical and chemical interaction determines why some pigments remain near the bottom while others travel much farther.
The importance of choosing the correct stationary phase.
Not all papers have the same density or the same thickness in their plant fibers. Paper that is too compact will prevent the liquid from passing through, while one that is excessively porous will let everything pass so quickly that there will not be enough time for separation to occur. Coffee filter paper has the perfect balance for our experiments because its internal channels allow a constant speed.
What is the mobile phase in this analysis process.
The second element is the mobile phase, which is the liquid that will move along the paper. This liquid has the function of dissolving the ink sample and carrying it along as it moves across the porous surface. The movement of this liquid occurs due to a very curious physical phenomenon called capillarity.
Capillarity is the ability of some fluids to rise through extremely thin channels, even going against the force of gravity. It is the same mechanism that plants use to absorb water from the soil and distribute it to all the upper leaves.
The physical forces that push the liquid upwards.
Capillarity occurs thanks to the combination of two forces of nature that act at the same time on the molecules of the fluid. On one hand, there is the force of cohesion, which is the mutual attraction that keeps the molecules of the liquid itself together. On the other hand, there is the force of adhesion, which is the attraction that those same molecules feel for the walls of the cellulose channel of the paper. When adhesion is stronger than cohesion, the liquid clings to the walls of the pore and climbs spontaneously.
The speed of the solvent front.
The invisible line that marks the highest point the liquid is reaching in its rise is called the solvent front. This line advances quickly at first when the paper is dry because the empty pores exert a lot of suction force. As the paper becomes soaked and the height increases, the force of gravity begins to counteract the rise, slowing the flow rate. It is essential to monitor this advance in order to stop the experiment before the liquid reaches the far end of the paper.
How pigments interact during the race.
As the liquid of the mobile phase rises up the paper, it encounters the different pigments of the ink and carries them along. Each of these pigments has a different molecular size and a different affinity for both the liquid and the paper itself.
The components that dissolve better in the liquid and stick less to the paper will travel at full speed to the top. Those that are heavier, or have more affinity for the paper fibers, will lag behind along the way, thus achieving the complete separation of the mixture.
The concept of selective chemical affinity.
Affinity is nothing more than the tendency that a molecule has to bind to another due to electrical charge or structure. The ink pigments enter into a kind of game of conflicting loyalties while the process lasts. If a pigment has a structure very similar to that of the paper’s cellulose, it will prefer to remain retained in it as long as possible. If, on the contrary, its structure more closely resembles that of water or rubbing alcohol, it will break its bonds with the paper to leave with the moving fluid.
The importance of solubility in separation.
Solubility is the ease with which a substance dissolves in another and plays a crucial role in this journey. A pigment that barely dissolves in the eluent will move in a very clumsy and slow manner, practically staying at the starting line. On the other hand, compounds with excellent solubility fully integrate into the mobile phase, becoming the undisputed leaders of the race. This marked difference is what allows us to see clean and well-separated color bands instead of a homogeneous blurry stain.
What materials do we need to observe paper chromatography.
The best thing about researching paper chromatography is that you almost certainly have everything in the kitchen or in the drawers at home. The main element is the paper and, for it to work well, the ideal is to use white filters of those used in drip coffee makers.
This type of paper is made of cellulose and does not have treatments that could hinder the flow of liquids. If you do not have this type of filter, you can try with absorbent kitchen paper, although the results are not as defined because the fibers are thicker.
Why white filter paper is king.
White coffee filters go through a manufacturing process that removes impurities from the wood and the natural resins of the plant. This leaves us with an almost perfect cellulose support, which reduces chemical interferences during the experiment.
Brown or unbleached filters contain traces of lignin that can alter the electric attraction of the pigments, changing the final result. That is why I will always recommend that you choose the white option so that your analyses come out flawless.
Homemade alternatives if you don’t have coffee filters.
If you feel like doing the experiment on a Sunday afternoon and you don’t have coffee filters, baking paper won’t work because it is impermeable. You can try the strips from the edges of old newspapers if they are a very porous quality and have no printing ink.
Matte school cardboard sometimes works, but its thickness slows down the rise of the liquid so much that the process can become endless. Kitchen absorbent paper is your best secondary alternative, cutting the strips in the direction of the fiber so that it doesn’t fall apart when wet.
The appropriate eluting liquids for each ink.
You will also need the liquids that will function as the mobile phase, which are technically called eluents. Depending on the type of markers you decide to analyze, it will be better for you to use tap water or rubbing alcohol.
Water is perfect for regular school markers because their inks usually have an aqueous base that dissolves very easily. You will need alcohol if you want to try permanent markers, as their inks resist water but quickly break down when they come into contact with rubbing alcohol.
The behavior of tap water as a mobile phase.
Water is an excellent polar solvent that interacts wonderfully with inks designed for children because they are made to be washable. As it rises through the paper, the water dissolves the binders of the school ink and releases the pigments so that they can flow freely. If you notice that the colors separate too chaotically, you can add a pinch of regular salt to the water in the glass. This changes the ionic strength of the liquid and helps the color bands remain much more defined and stable.
When and how we should use rubbing alcohol.
Pharmacy alcohol is an organic solvent that has a different polarity than water, which allows it to break down the acrylic polymers in permanent inks. If you try to analyze a permanent marker with water, you will see that the stain remains intact on the surface while the water passes by without moving it.
By replacing the water with alcohol, the dark spot dissolves instantly and begins to reveal its hidden components. It is a fantastic exercise for understanding how the chemical nature of the liquid completely changes the outcome of the analysis.
Color selection for paper chromatography.
Finally, you are missing the colors that you are going to put to the test to see how they behave. I recommend that you look for black markers from different brands because you you may be surprised to discover that not all black inks are made the same way. Secondary colors like purple, green, or orange are also very useful, because they break down in a very clean way into the corresponding primary colors.
To hold the paper while the liquid rises, it will be useful to have on hand some transparent glass cups, some pencils, and some clothespins.
The visual play of secondary colors.
Colors like green or purple are ideal for learning, because they show the theory of color directly on the paper. A school green marker will almost always split into a very defined bluish stripe that rises quite high and a yellow blotch that stays lower.
Purple will give you a beautiful transition between a very bright fuchsia pink and an intense ultramarine blue. Analyzing these secondary tones helps train the eye to predict which pigments are lighter even before the run ends.
The step-by-step for carrying out paper chromatography.
How to make a simple paper chromatography experiment
Cut the strips of paper
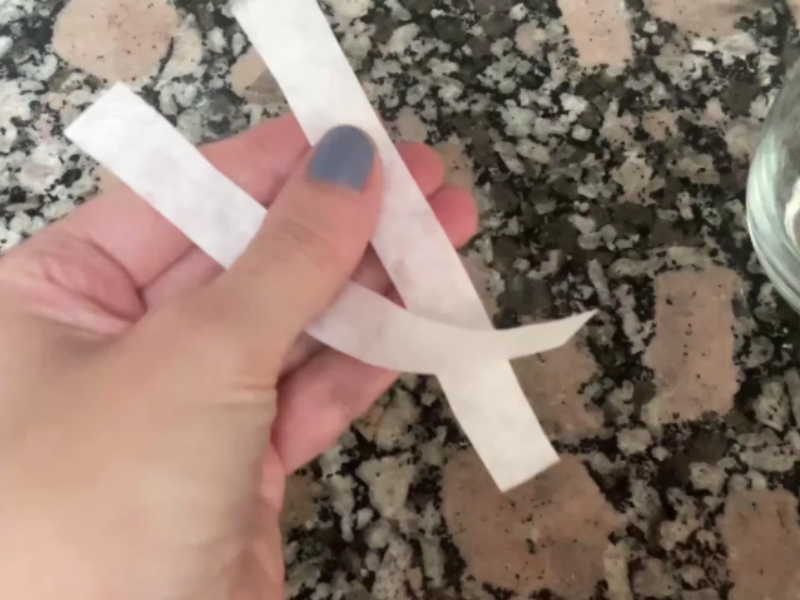
To start the experiment you have to cut the coffee filter paper into rectangular strips that are approximately two centimeters wide and about ten centimeters long.
Baseline tracing.
When you have the strips cut, you must take a graphite pencil and draw a horizontal straight line about two centimeters from the bottom edge of the paper. You must necessarily use a pencil because the graphite does not dissolve in the liquids we are going to use and will stay in place, serving as a reference point. If you make the mistake of drawing this guide with a regular pen, its ink will blend with that of the marker you want to study and will completely ruin the clarity of the analysis.
Application of the color sample.
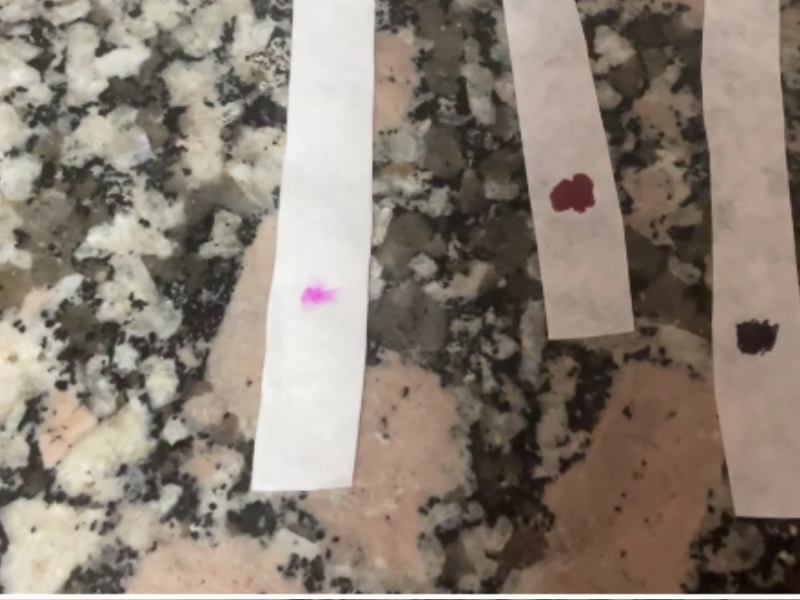
Right in the center of that pencil line you are going to make a dot with the marker you want to analyze. The dot should be small but intense, making sure the ink soaks the paper well but without spreading too much toward the edges of the strip. If you make too big a blot, the different colors will overlap with each other when the solvent starts to lift them, which will make the final stripes look mixed and unclear.
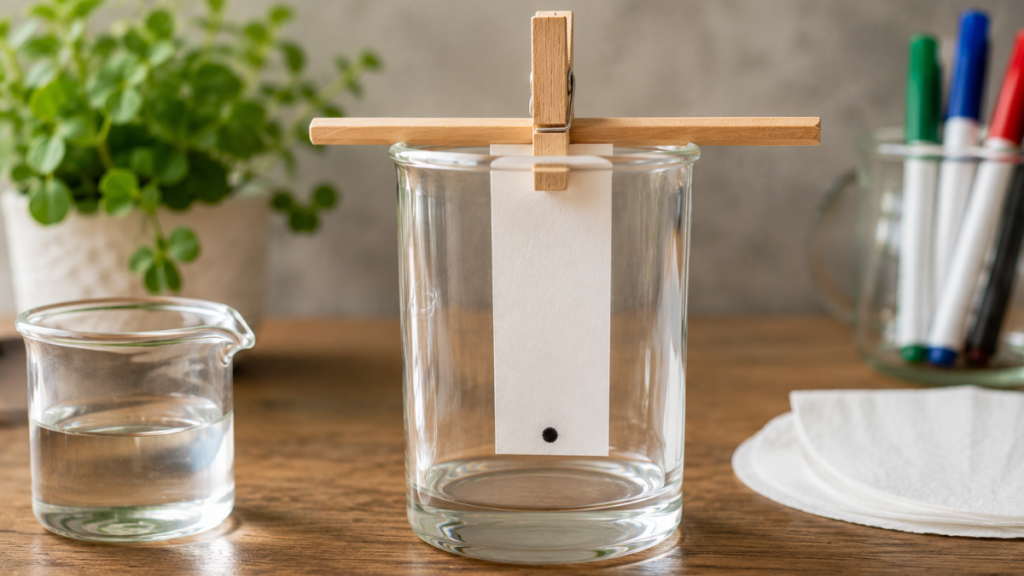
Preparation of the liquid in the glass.
Now you have to prepare the glass by pouring a little water or alcohol at the bottom. The amount should be very small, just half a centimeter in height, because we need the liquid to touch the lower edge of the paper but never reach to cover the ink dot you have drawn. This minimum height is crucial for the fluid to start its climb through the cellulose fibers in a clean and gradual way.
Assembly of the support structure.
To hold the paper, you have to hook the upper end of the strip to a pencil or a long stick using a clothespin. Then you rest the pencil on the edges of the glass, letting the paper strip hang down into it completely vertically. You must make sure that the sides of the filter paper strip do not touch the glass walls of the container, since friction or moisture accumulated on the glass would divert the natural progress of the eluent.
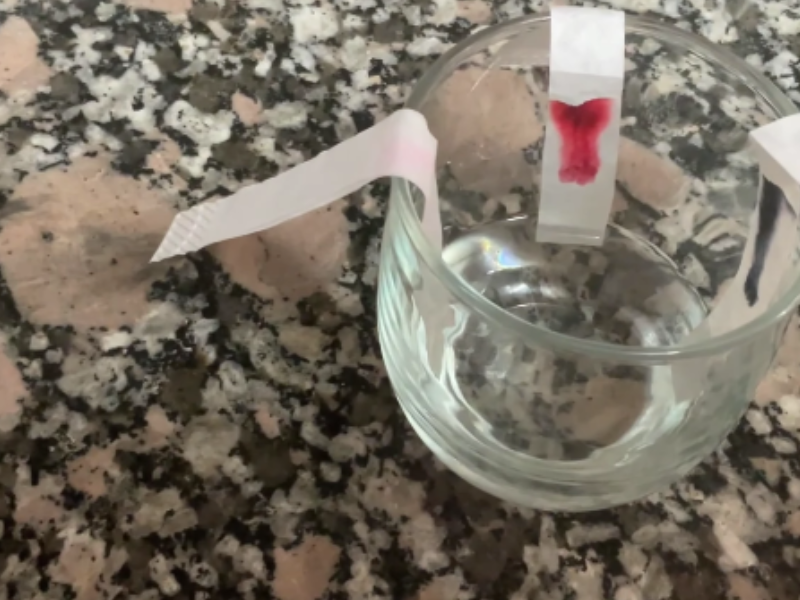
Development of the separation.
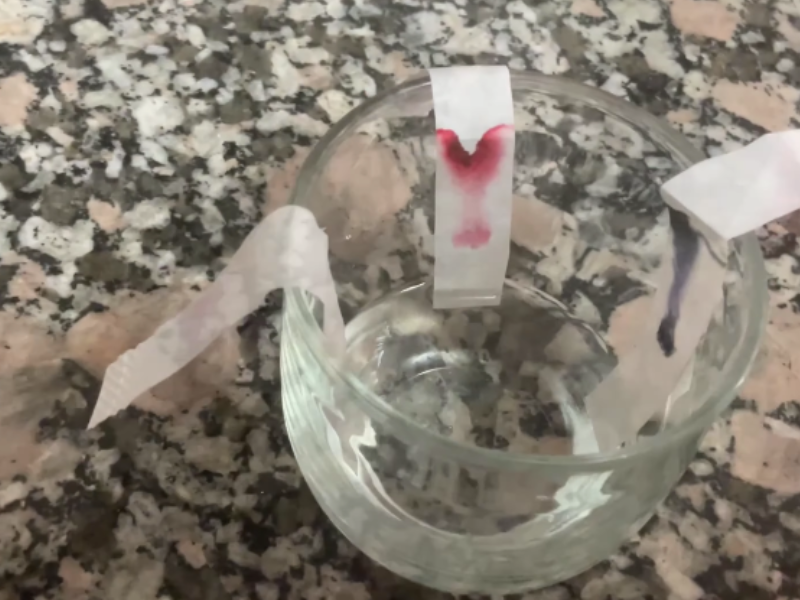
The moment the bottom edge of the paper touches the liquid, you will see how it begins to rise quickly through the fibers. You have to leave the glass still on the table without moving it at all and watch how the front of the liquid drags the colors and separates them along the way. It is a process that usually takes between ten and fifteen minutes to complete, depending on the porosity of the material and the type of solvent you are using at that moment.
Completion of the experiment.
When the liquid is one centimeter away from reaching the top edge of the paper, you should carefully remove the strip from the glass. With the same pencil as before, mark a small line where the liquid stopped and let the strip dry horizontally on a clean surface. Marking the end of the path while the paper is still wet is vital for later calculations, since once dry it is impossible to know exactly how far the water or alcohol traveled.
Tools:
- glass cups that are completely transparent,
- long wooden pencils or sticks, regular clothespins,
- some scissors, and
- a ruler to measure the strips.
Materials: white coffee filter, ninety-six degree rubbing alcohol or tap water, and several markers of different colors.
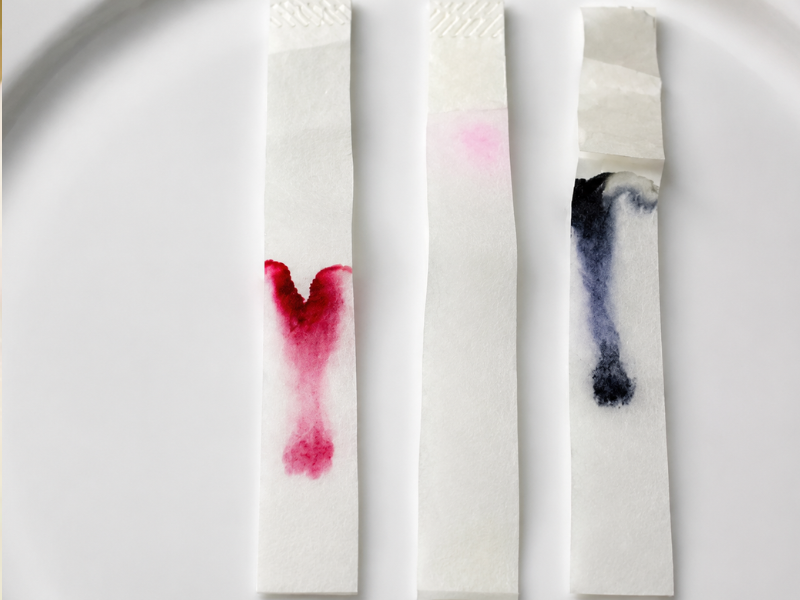
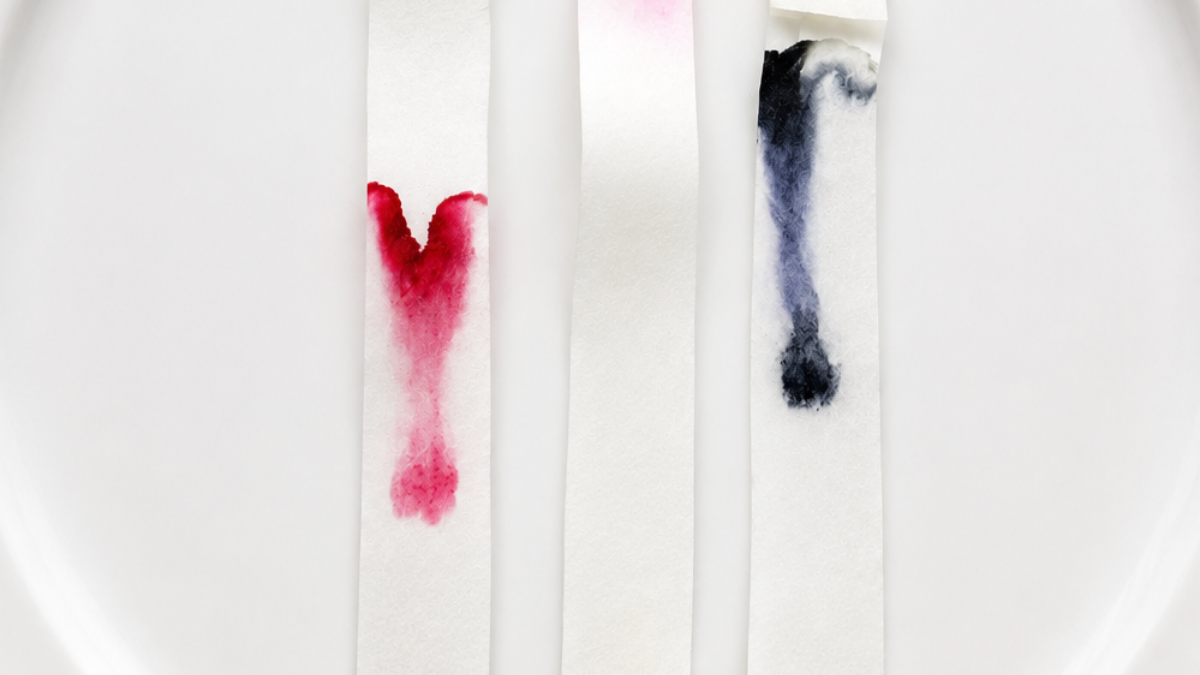
How to analyze the results obtained on your paper strips.
Once the paper is completely dry, the most fun moment arrives, which is interpreting what happened during the rise of the liquid. If you have used a black marker, you will see that the reddish or brownish tones have stayed at the bottom while blue or purple tones appear at the top. This pattern acts like a color map of the sample.
Interpretation of the weight of the pigments.
This distribution directly shows you which pigments are heavier and which are lighter within the mixture that makes up the ink. The colors that stay at the bottom have a larger molecular structure, or interact more strongly with the cellulose of the paper, which causes them to constantly slow down as they move forward. It’s as if the maze of fibers is much narrower and more complicated for them to pass through than for their racing companions.
Identification of solubility.
The colors that appear at the very top are those that have a very high solubility in the eluent liquid you have chosen. Since they dissolve so well, they are carried along by the flow of the fluid without offering resistance and travel lightly as far as the water or alcohol reaches.
These components barely pay attention to the structure of the paper and prefer to stay integrated in the moving stream, which makes them the fastest elements in the analysis.
If you prefer, you can watch it on video; it has subtitles.
The most common failures and how to fix them.
The most common mistake when starting to try paper chromatography is putting too much liquid at the bottom of the glass beaker. If the level of water or alcohol exceeds the line where you put the ink spot, the stain will dissolve directly in the bottom of the glass and color all the liquid. This is a very common oversight due to the rush to see the results, but it has an easy solution if we are attentive.
What happens if the ink drowns.
If this happens to you, you will see that the paper stays completely white and no separation occurs, because the ink has dispersed in the container. The solution is to empty the glass, dry it well, and repeat the process, making sure that the liquid always stays below the mark. Do not try to reuse the same strip of paper because the fibers will have already absorbed moisture unevenly and the new attempt will not turn out well.
The problem of using a pen for the guide lines.
Another common mistake is using a regular pen to draw the baseline where the color samples are placed. Pen ink is made of pigments that also dissolve, so it will rise along with the marker and smudge the entire final analysis result.
Graphite from a pencil, on the other hand, is made of carbon and is completely insoluble in water and alcohol, so it will keep the line intact and clean.
The mathematical calculation that provides precision to the experiment.
When you start to observe the strips of paper, you realize that the colors always stop in similar areas if you use the same brands of marker. This is because the migration speed of each pigment is a constant physical property that can be measured and calculated very easily.
Chemists use a very basic mathematical formula to obtain a numerical value that identifies each component and which they call the retention factor.
Measurement of distances on the paper.
To calculate this factor you only need a common millimeter ruler and carry out two very simple measurements on the strip of paper once it is completely dry. The first measurement is the total distance that the eluting liquid has traveled, counting from the baseline you drew in pencil to the top mark where the water or alcohol stopped.
Application of the retention factor formula.
The second measurement is the distance from that same pencil line to the exact center of the stain of the color you want to analyze. Once you have both data in millimeters, you simply need to divide the color distance by the liquid distance.
The result will always be a decimal number between zero and one that will help you identify that exact pigment in any other analysis you do in the future.
Interesting variations using plant elements.
Paper chromatography is not only useful for discovering the components of artificial inks that we buy at stationery stores. One of the most beautiful applications of this method is analyzing the natural pigments hidden in the leaves of the plants we have on the balcony or in the vegetables we keep in the pantry or in the refrigerator.
Extraction of the pigments from the leaves.
To make this variant, you have to crush a handful of green leaves in a mortar along with a splash of ninety-six-degree alcohol until the liquid takes on a very intense green color. That liquid contains the chlorophyll of the plant dissolved in the alcohol and is the sample that you will place on the filter paper strip.
You have to put a drop on the pencil line, let it dry well, and put another drop on top so that the sample is well concentrated.
Separation of the different chlorophylls.
When you put the strip in the glass with alcohol, you will see that the original green starts to separate into several bands of very different shades. A bluish-green band will appear, which corresponds to chlorophyll type A, and another yellowish-green band, which is chlorophyll type B. Higher up you will notice some light yellow areas, which are the xanthophylls, and at the very top you will see an orange line that belongs to the carotenes, which are the same pigments that give color to carrots.
Frequently asked questions about paper chromatography.
Why do manufacturers mix so many colors to get the color black?
Most companies that manufacture inks do not use a single black pigment because it usually results in a very dull and translucent tone on paper. To achieve a black that is truly intense, bright, and covers the surface well, they prefer to mix several secondary and primary colors in carefully studied proportions. By combining dark blue, red, and purple tones, our eyes visually perceive a homogeneous black color, but paper chromatography is responsible for breaking down that mixture and showing us the real combination used by the manufacturer.
Can this same analysis be done using regular writing paper?
Common printer paper or notebook paper does not work well for this experiment because it undergoes a special treatment during manufacturing to make it smooth and not absorb too much ink. This treatment clogs the microscopic pores of the cellulose fibers, preventing the liquid from the mobile phase from rising by capillarity at an adequate speed. If you try it with this type of paper, you will find that the process is extremely slow and the colors barely separate, leaving the stains blurred on the base
What happens if we change the alcohol content that we use in the glass?
The alcohol content tells us the amount of pure water contained in the bottle we buy at the pharmacy. Ninety-six-degree alcohol has very little water in its composition, so it dissolves very quickly the components of permanent markers that are water-resistant. If you use alcohol with a lower content, such as seventy-degree alcohol, the liquid will take longer to rise and the separation of the colors will change completely because the presence of water modifies the way the pigments interact with the paper.
Why do some pigments move faster than others?
The displacement of each component depends directly on its solubility in the liquid and its molecular weight. Substances that are very soluble in water or alcohol dissolve instantly and are carried by the ascending current of the fluid without offering resistance. On the contrary, molecules that are larger and heavier or that have a chemical structure similar to that of cellulose tend to stick continuously to the fibers of the paper, which delays their progress and causes them to remain in the lower areas of the strip.
Investigating all these reactions at home helps us understand that science is very accessible and surrounds us constantly in the most everyday objects.
If you feel like trying paper chromatography with the markers you have at home or with the leaves from your plants, I would love for you to tell me the results you have obtained. You can leave me a comment below to share your experience and resolve any doubts that may have arisen during the process.

